.png?width=250&height=92&name=Reunion_Logo_White%20(1).png)
Before you start:
- You have a payroll hours CSV export from your payroll system or a third-party tool (for example, LCP).
- You know whether the file contains daily or weekly hours.
- You know which project contract the hours should be uploaded to.
Note: This is a mapping tool. You are not changing your original CSV, you are telling Reunion how to read it.
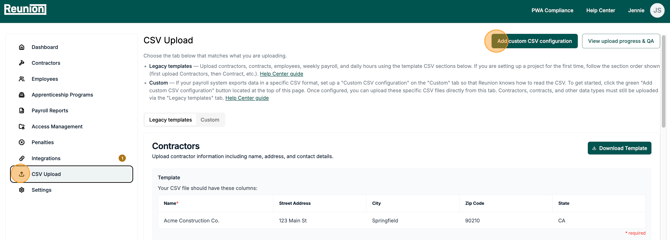
1. Go to the CSV Upload page in Reunion.
2. Click on the "Add Custom CSV Configuration" button
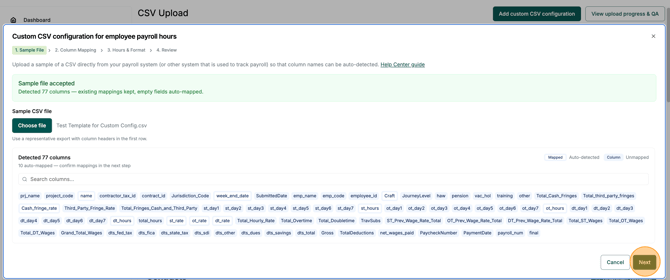
3. You will be prompted to upload a small sample of your CSV so the column names can be auto-detected. Please note:
-
The sample CSV file must contain several rows of data, even if it is placeholder information.
-
The CSV file should have separate columns for straight-time, overtime and double time totals.
-
Each column in the CSV file must have a unique name. The file will get rejected if there are duplicative column names, i.e. more than one "craft ID" column.
Once the file has been uploaded, the screen will list which columns were detected. Select the "Next" button.
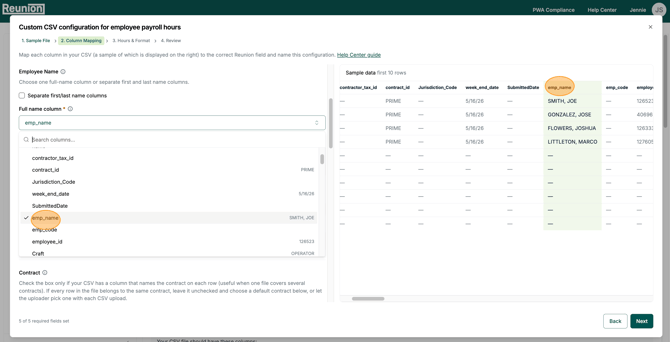
4. The next step (Column Mapping) will prompt you to map each column in your CSV to the correct Reunion field. The mapping options will appear on the left, and your CSV sample file will appear on the right. This allows you to reference the file as you walk through each step.
To avoid errors, when you select an option from the dropdown menu, the corresponding column in the sample file (on the right) will highlight in green.
The Column Mapping step will require the following actions/information:
-
Name the template (e.g. My Payroll System CSV).
-
Add a description (optional). Add notes about when to use this configuration or which payroll export it matches.
- Determine the CSV delimiter. Indicate the character that acts as a boundary marker in your CSV, separating different pieces of data or text. There are several options for this step:
- Auto-detect (default): We will automatically determine the character that separates different pieces of data in your file.
- Comma: Select this option if your file name ends in “.csv”.
- Pipe: Select this option if your file name ends in “.psv” or is a “.txt” file in which different pieces of data are separated by the “|” character.
- Tab: Select this option if your file name ends in “.tsv”.
- Employee Name: Map how employee names appear in your CSV. The system will automatically check off that the employee's first and last name are in separate columns in your original file. If this is not the case, uncheck this box. Then, proceed to select the following:
- Full name column (as it appears on your original file)
- Name delimiter
- Name order
-
Contract: There are several options for deciding how or when to associate the contract (project) with the payroll data:
-
Check the "Contract name comes from a CSV column" box only if your CSV has a column that names the contract on each row (useful when one file covers several contracts).
-
If every row in the file belongs to the same contract, leave it unchecked and choose a default contract below, or let the uploader pick one with each CSV upload.
-
-
Contractor: There are several options for deciding how or when to associate the contractor with the payroll data:
-
Check the "Contractor name comes from a CSV column" box only if your CSV has a column that names the contractor on each row (useful when one file covers several contractors).
-
If every row in the file belongs to the same contractor, leave it unchecked and choose a default contractor below, or let the uploader pick one with each CSV upload.
-
-
Core Columns: If Auto-detect is selected, all fields in this section will populate from the original CSV. It is important to cross-reference this file with Reunion to ensure accuracy.
-
Rate Columns: If Auto-detect is selected, all fields in this section will populate from the original CSV. It is important to cross-reference your file with what Reunion populates to ensure accuracy.
Note: If the fringe amount on your original file is a total cash sum and not a single rate, you can calculate the base rate by selecting the "Divide two columns" option, and dividing the total cash fringe amount column by the total hours column from your file.
-
Employee Level Determination: Select the option that will best enable Reunion to determine if the worker is an apprentice.
-
Infer from classification text (contains "apprentice")
-
From a dedicated column: Select which column that contains the worker's level. The apprentice indicator is the text that marks a value as an apprentice from your file (e.g. "Appr").
-
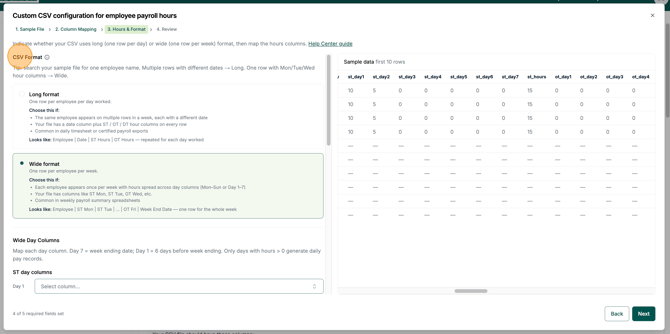
5. The next step is to indicate the format in which the CSV file displays employee hours. There are two options: Long or Wide.
- Long format: One row per employee per day
- Wide format: One row per employee per week.
- When using this format, you will need to map each "day of the week" column from your CSV to the appropriate field in Reunion. This will need to be mapped for ST, OT and DT columns.
- Tip: When mapping each ST, OT and DT days to the appropriate column from the drop down menu, start typing "ST" or "OT" etc. to jump to these options, instead of scrolling through the list of column options.
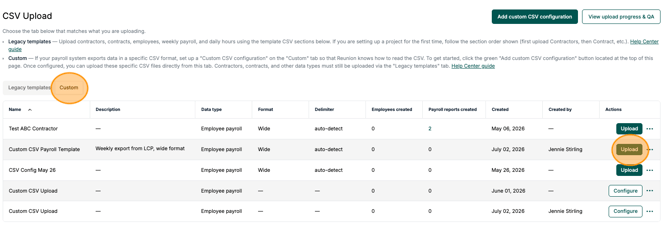
6. Review and Save: Review your selected options and click "Save Configuration." Your template will then appear under the "Custom" tab on the CSV Upload page.
To begin using the custom template and upload payroll data, click the green "Upload" button in the Actions column.
To make edits to the custom template, click on the three dots (...) button under the "Actions" column, and click "Edit Configuration."