1. Go to the CSV Upload page in Reunion

2. Find the template you want to use to bulk upload data (contractors, contracts, employees, weekly payroll or daily hours)
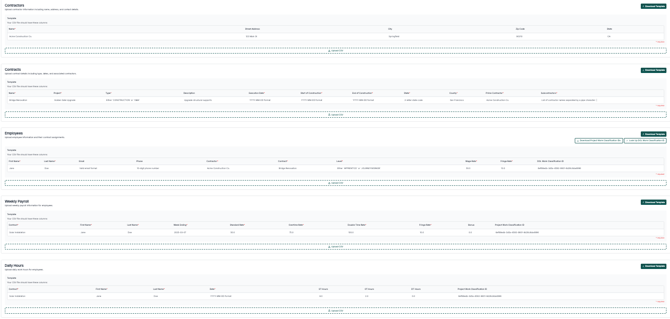
Use the "Contractors" template to bulk upload contractors
-
Download the template under "Download template"
-
Fill out the contractor name, and address information (if you have it) in the template
- Drop the completed template into "Upload CSV"

Use the "Contracts" template to bulk create contracts for projects
-
Download the template under "Download template"
-
Fill out the contract details in the template
- Drop the completed template into "Upload CSV"

Use the "Employees" template to bulk upload employees
-
Download the template under "Download template"
-
Fill out the Employee details
Note: Contractor and Contract name must match identical to how it exists in Reunion
Note: Level must be capitalized for "APPRENTICE" or "JOURNEYWORKER"
To tell Reunion what an employee's DOL work classification is, you will need to find the DOL work classification ID to paste into the Employees template.
-
To find this, click "Look up DOL Work Classification ID".

- Add the contract and construction type
We have an ID code for every applicable DOL classification under that project/contract.
-
Find the DOL Work Classifications listed under "Search work classifications..."
- Copy the code to the right of the classification
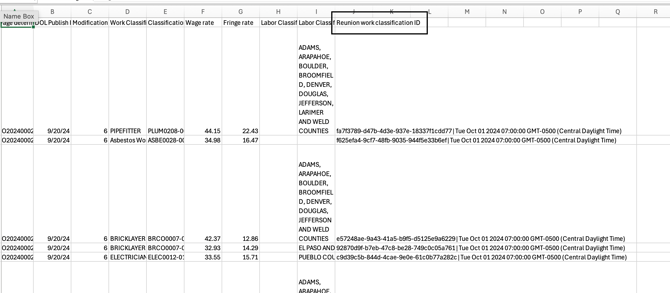
- Or download the entire list of applicable classifications by clicking "Download Classifications CSV" and copy the "Reunion work classification ID"
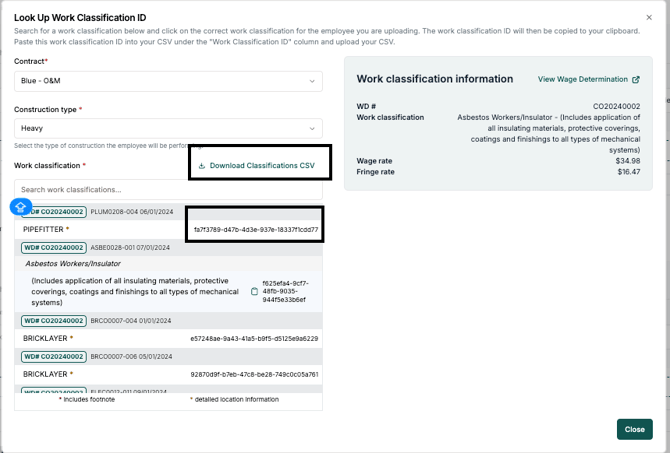
- Paste the ID code into your Employees template under "DOL Work Classification ID"

- Drop the completed template into "Upload CSV" to bulk upload employees
Use the "Weekly Payroll" template to bulk upload wage data for given week(s)
-
Download the template under "Download template"
-
Add the project/contract name, employee name, the week ending date for the payroll report (2000-03-07 format), and the wage rates they were paid that week

Note: Contract name must match identical to how it exists in Reunion
Note: Employee name must match identical to how it exists in Reunion
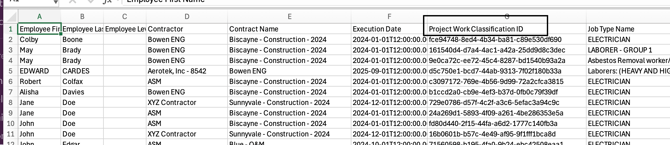
For employees that work multiple work classifications on a project: You will need to add a "Project Work Classification ID" to showcase what classification they worked on that given payroll report week
-
To grab that, download the "Project Work Classification IDs" list under the "Employees" section

-
Copy the "Project Work Classification ID" for your employee(s)
- Paste the ID code into the Weekly Payroll template under "Project Work Classification ID"
- Drop the completed template into "Upload CSV"
Use the "Daily Hours" template to bulk upload day-by-day labor records
-
Download the template under "Download template"
-
Add the project/contract name, employee name, individual date that they worked, and their hours for that date
Note: Contract name must match identical to how it exists in Reunion
Note: Employee name must match identical to how it exists in Reunion
For employees that work multiple work classifications on a project: You will need to add a "Project Work Classification ID" to showcase what classification they worked on that given payroll report week
-
To grab that, download the "Project Work Classification IDs" list under the "Employees" section
-
Copy the "Project Work Classification ID" for your employee(s)
- Paste the ID code into the Daily Hours template under "Project Work Classification ID"
- Drop the completed template into "Upload CSV"
The key thing to keep in mind is the role of each template and the order they need to be uploaded:
-
The Weekly CSV template captures who worked during a given workweek, what scope/classification they worked under, and what they were paid for that week. This establishes the weekly payroll record in the system.
-
The Daily CSV template captures how that same weekly labor was distributed across individual days, including the specific dates worked and the number of hours worked each day.
Because of that relationship, the Weekly template must be uploaded first. The Daily template must then reference the same workweek dates so the system can properly tie daily hours back to the correct weekly payroll record.
You’re welcome to upload multiple weeks at a time in the Weekly template. Just be sure that when you upload the Daily template, the daily dates fall within the corresponding weekly date ranges that were uploaded first.